Stuff I've spent entirely too much time on during the last 2 weeks
This blog post comes in two variants, based on a simple condition.
- Are you my thesis supervisor: I’ve done lots of thesis :) this blog post is finished now.
- Otherwise: keep reading
Recently I stumbled upon my old NAS. It’s been turned off since a while, and I really had no clue what’s on it. However, I decided I should integrate it in my “homelab”. The homelab I had at that point consisted exclusively of one old desktop computer at my parents place. Further, the computer is directly connected to the ISP router, and essentially everything I accessed was over the public internet (with good credentials of course).
Clearly, it was not suitable to hook up a NAS the same way, as there’s constant security vulnerabilities on those kind of devices. The solution I decided on was to set up a VPN to access the NAS.
Chapter 1: Setting up a VPN
1.1: Selecting Hardware
Just as almost every other person studying CS, I had a raspberry pi around that I didn’t use. More specifically, a Raspberry Pi 3b+. It sounded powerful enough to me at the time. (subtle foreshadowing)
1.2: Selecting VPN Software
When choosing VPN I was aware of three choices: OpenVPN, WireGuard, and Tailscale.
WireGuard I instinctively decided against because I tried to set it up once before and I only ever had issues building up the connection - I don’t know why, but I didn’t feel like repeating that experience.
Of tailscale I’ve heard many good things. However, I didn’t want to rely on a third-party service for no otherwise good reason so I ditched that idea.
What’s left was OpenVPN, so I chose that
1.3: Selecting OS
“Wait a minute Jonas, why are you saying ‘selecting OS’ instead of ‘selecting distro’, aren’t you gonna use Linux?” Well, Linux is certainly one option - but not the only one :)
In my mind I had two options - either Linux with a very boring distribution such as debian, or one of the BSDs. Of the widely used BSDs (FreeBSD, OpenBSD, NetBSD), FreeBSD is the most widely used one, at least if you trust a graph from 2005 that is linked in Wikipedia.
I ended up choosing FreeBSD, as it’s reported to have a great network stack, and that’s really all I need from a VPN server.
1.4: Setting everything up
OpenVPN didn’t seem too difficult to set up (:clueless:).
I needed a config that looks about like the following:
ca pki/ca.crt
cert pki/issued/server.crt
key pki/private/server.key
dh pki/dh.pem
tls-auth ta.key 0

port 11941
proto udp
dev tun

topology subnet
server 10.214.1.0 255.255.255.0
Some extra security I enabled here was tls-auth: it adds a HMAC signature to all TLS handshakes which sounds good as it can immediately close connections that don’t know that secret.
topology subnet is the recommended config: what it means roughly is that it selects an IP for every client from the IP range given in the server directive.
It’s not supposed to overlap with the IP addresses given out by your ISP router, as that will lead to conflicts.
I started the service, changed router settings to forward the VPN port, and all seemed to work - I could connect to the vpn via port 11941, and after that I could SSH into the raspberry pi.
1.5: Now that everything works, why are there 5 more chapters?
All done with the VPN setup? Not quite.
Some time later I connected to the VPN and tried to SSH into my main server (the one that is serving this blog) - and it timed out :o
It took me a while to figure out what was happening, and it was very stupid:
When traffic is tunneled through the VPN, traffic from my laptop to the server would appear with source IP 10.214.1.2 to the server.
The server would respond to this, and since 10.214.1.2 is not a local IP address (that would be in the 192.168.1.0/24 subnet) it sent the response via the router.
The router saw that packet, inspected it, saw that it can’t be sent back to the LAN (192.168.1.0/24 subnet), saw that it can’t be sent to the internet (private IP), so it simply dropped it.
The easy solution was to enable NAT on the VPN host, such that it would rewrite IPs from the 10.214.1.0/24 range to its own IP in the 192.168.1.0/24 subnet, and store port mappings such that it could correctly route traffic back.
1.6: Performance
Everything so far is connected up with 1Gb/s ethernet links. I was certain that the speed would be limited by those.
Turns out: I was wrong. With the current setup (NAT enabled on the VPN host), I got a throughput of about 12 Mb/s - ouch. Disabling NAT again just for a speedtest, I got to about 25 Mb/s.
Ideally I’d get about 400-500 Mb/s, as that is roughly the available speed the ISP router gives me, and since the VPN traffic uses the cables between VPN gateway and router twice.
1.7: Split that Tunnel
Being presented with those bad speeds, a thought crossed my mind: Ideally I don’t pipe the entirety of my laptop’s internet traffic through the VPN, but only the traffic to communicate with my homelab.
Lucky for me the developers of OpenVPN already thought of that - you can very easily set up “split tunneling”. The idea is simple: declare a list of IP subnets that should go through the tunnel, and let the rest of the network traffic travel the internet via your default gateway.
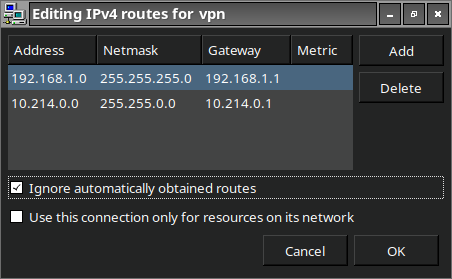
Important: select “Ignore automatically obtained routes”.
1.8: Getting rid of the NAT by adding a NAT
So it turns out that it’s possible to not need to use NAT on the VPN server itself. How? By telling the router that traffic that goes to the VPN-client-subnet goes via the private IP of the VPN server.
Now, the router the ISP provided does not have that functionality. However, that doesn’t stop me from connecting my own router to the ISP router :)
As bad as cheap ubiquiti routers are, they still have quite good configuration options (compared to ISP routers of course). There, I could simply add this configuration snippet:
protocols {
    static {
        route 10.214.1.0/24 {
            next-hop 10.214.0.11 {
                description "vpn-1 clients"
            }
        }
    }
}
After adding that, I could disable NAT on the VPN server again, and IP addresses of VPN clients would finally make sense to the other devices on the network.
Chapter 2: Setting up DNS
Another thought crossed my mind: since now only traffic going to my own private IP ranges travels across the VPN, when I access a machine by hostname (like log.jnsmr.ch), it still travels across the open internet since that name resolves to a public IP address.
That didn’t sit well with me and I thought of ways to amend that, such that traffic automatically gets rerouted whenever I’m connected to my VPN.
The solution is ovious: host my own nameserver!
2.1: Selecting DNS software
I already knew of pihole, since I’ve used that before as an adblock, but I didn’t want to jump to decisons too quickly. After researching for probably about 5 minutes, I found out about two more DNS softwares: bind, and unbound. Unbound objectively sounds cooler, and also it’s used within pihole and is already included in FreeBSD, so I chose that one.
2.2: Setting up unbound
Unbound was rather straight-forward to set up. It has an extensive sample config file (with lots of explanatory comments), and the syntax is easy to understand.
my config file ended up not too long:
server:
    verbosity: 0
    num-threads: 1
    interface: 0.0.0.0
    so-sndbuf: 1m
    cache-max-negative-ttl: 60
    do-ip4: yes
    do-udp: yes
    do-tcp: yes
    access-control: 0.0.0.0/0 allow
    root-hints: "/usr/local/etc/unbound/root.hints"
    interface-automatic: yes
    hide-identity: yes
    hide-version: yes

    local-zone: "jnsmr.ch." static
    local-data: "jnsmr.ch. IN A 10.214.0.20"
    local-data: "tea.jnsmr.ch. IN A 10.214.0.20"
    local-data: "log.jnsmr.ch. IN A 10.214.0.20"
    local-data: "rou-1.jnsmr.ch. IN A 10.214.0.1"
    local-data: "vpn-1.jnsmr.ch. IN A 10.214.0.11"
    local-data: "dns-1.jnsmr.ch. IN A 10.214.0.11"
    local-data: "vpn-gate-1.jnsmr.ch. IN A 10.214.1.1"
The most important line here for me was interface-automatic: yes - since the DNS server has two IPs available (the normal IP 10.214.0.11 and the gateway IP of the VPN client subnet 10.214.1.1) it is important that it responds from the IP address a request was sent to.
If you don’t enable that, as I found out, clients never accept DNS responses which looks roughly like this:

2.3 Configuring the client
As for using this nameserver specifically when being connected to the VPN, OpenVPN of course has an answer - you can specify additional nameservers while connected to the VPN:

A very important thing to note here is that that says Additional DNS Servers - it will not only use those, but add them to the roster of available DNS servers on the system. To (probably) only ever use those DNS servers, I needed to run nmcli connection modify "vpn_name_here" ipv4.dns-priority -50 to make that the highest priority DNS server.
Locally this worked flawlessly, and would immediately resolve my domain to the private IP whenever I connected to the VPN. (Either it invalidates local DNS cache or it simply does not cache it, I have not inspected it)
What this does not yet address is browsers. As so often, they make everything more complicated again. Firefox nowadays defaults to DNS-over-HTTPS and completely circumvents the local DNS resolver. After disabling that though, it even works there :)
Chapter 3: Setting everything up again
As maybe hinted on by the previous screenshots, there’s another DNS server. I’ve set up another device with a similar software stack for redundancy - OpenVPN, Unbound, and Debian. I figured if I’m gonna do redundancy I should also look that the two machines don’t die at the same time because of broken package updates or something of the sort.
The OpenVPN client even allows you to randomly connect to one or the other VPN server, which seems quite convenient.
However, I’ll probably stick to making the second VPN server the primary one, since it’s shown to be faster than the raspberry pi.
Summary
So what does my overcomplicated set-up even look like now?
The beautiful diagram version looks like this:
ISP Router
  |
 rou-1
| | | |
| | | \- vpn-1 = dns-1
| | \--- vpn-2 = dns-2
| \----- the server
\------- NAS
The not-so-beautiful not-diagram version looks like this:
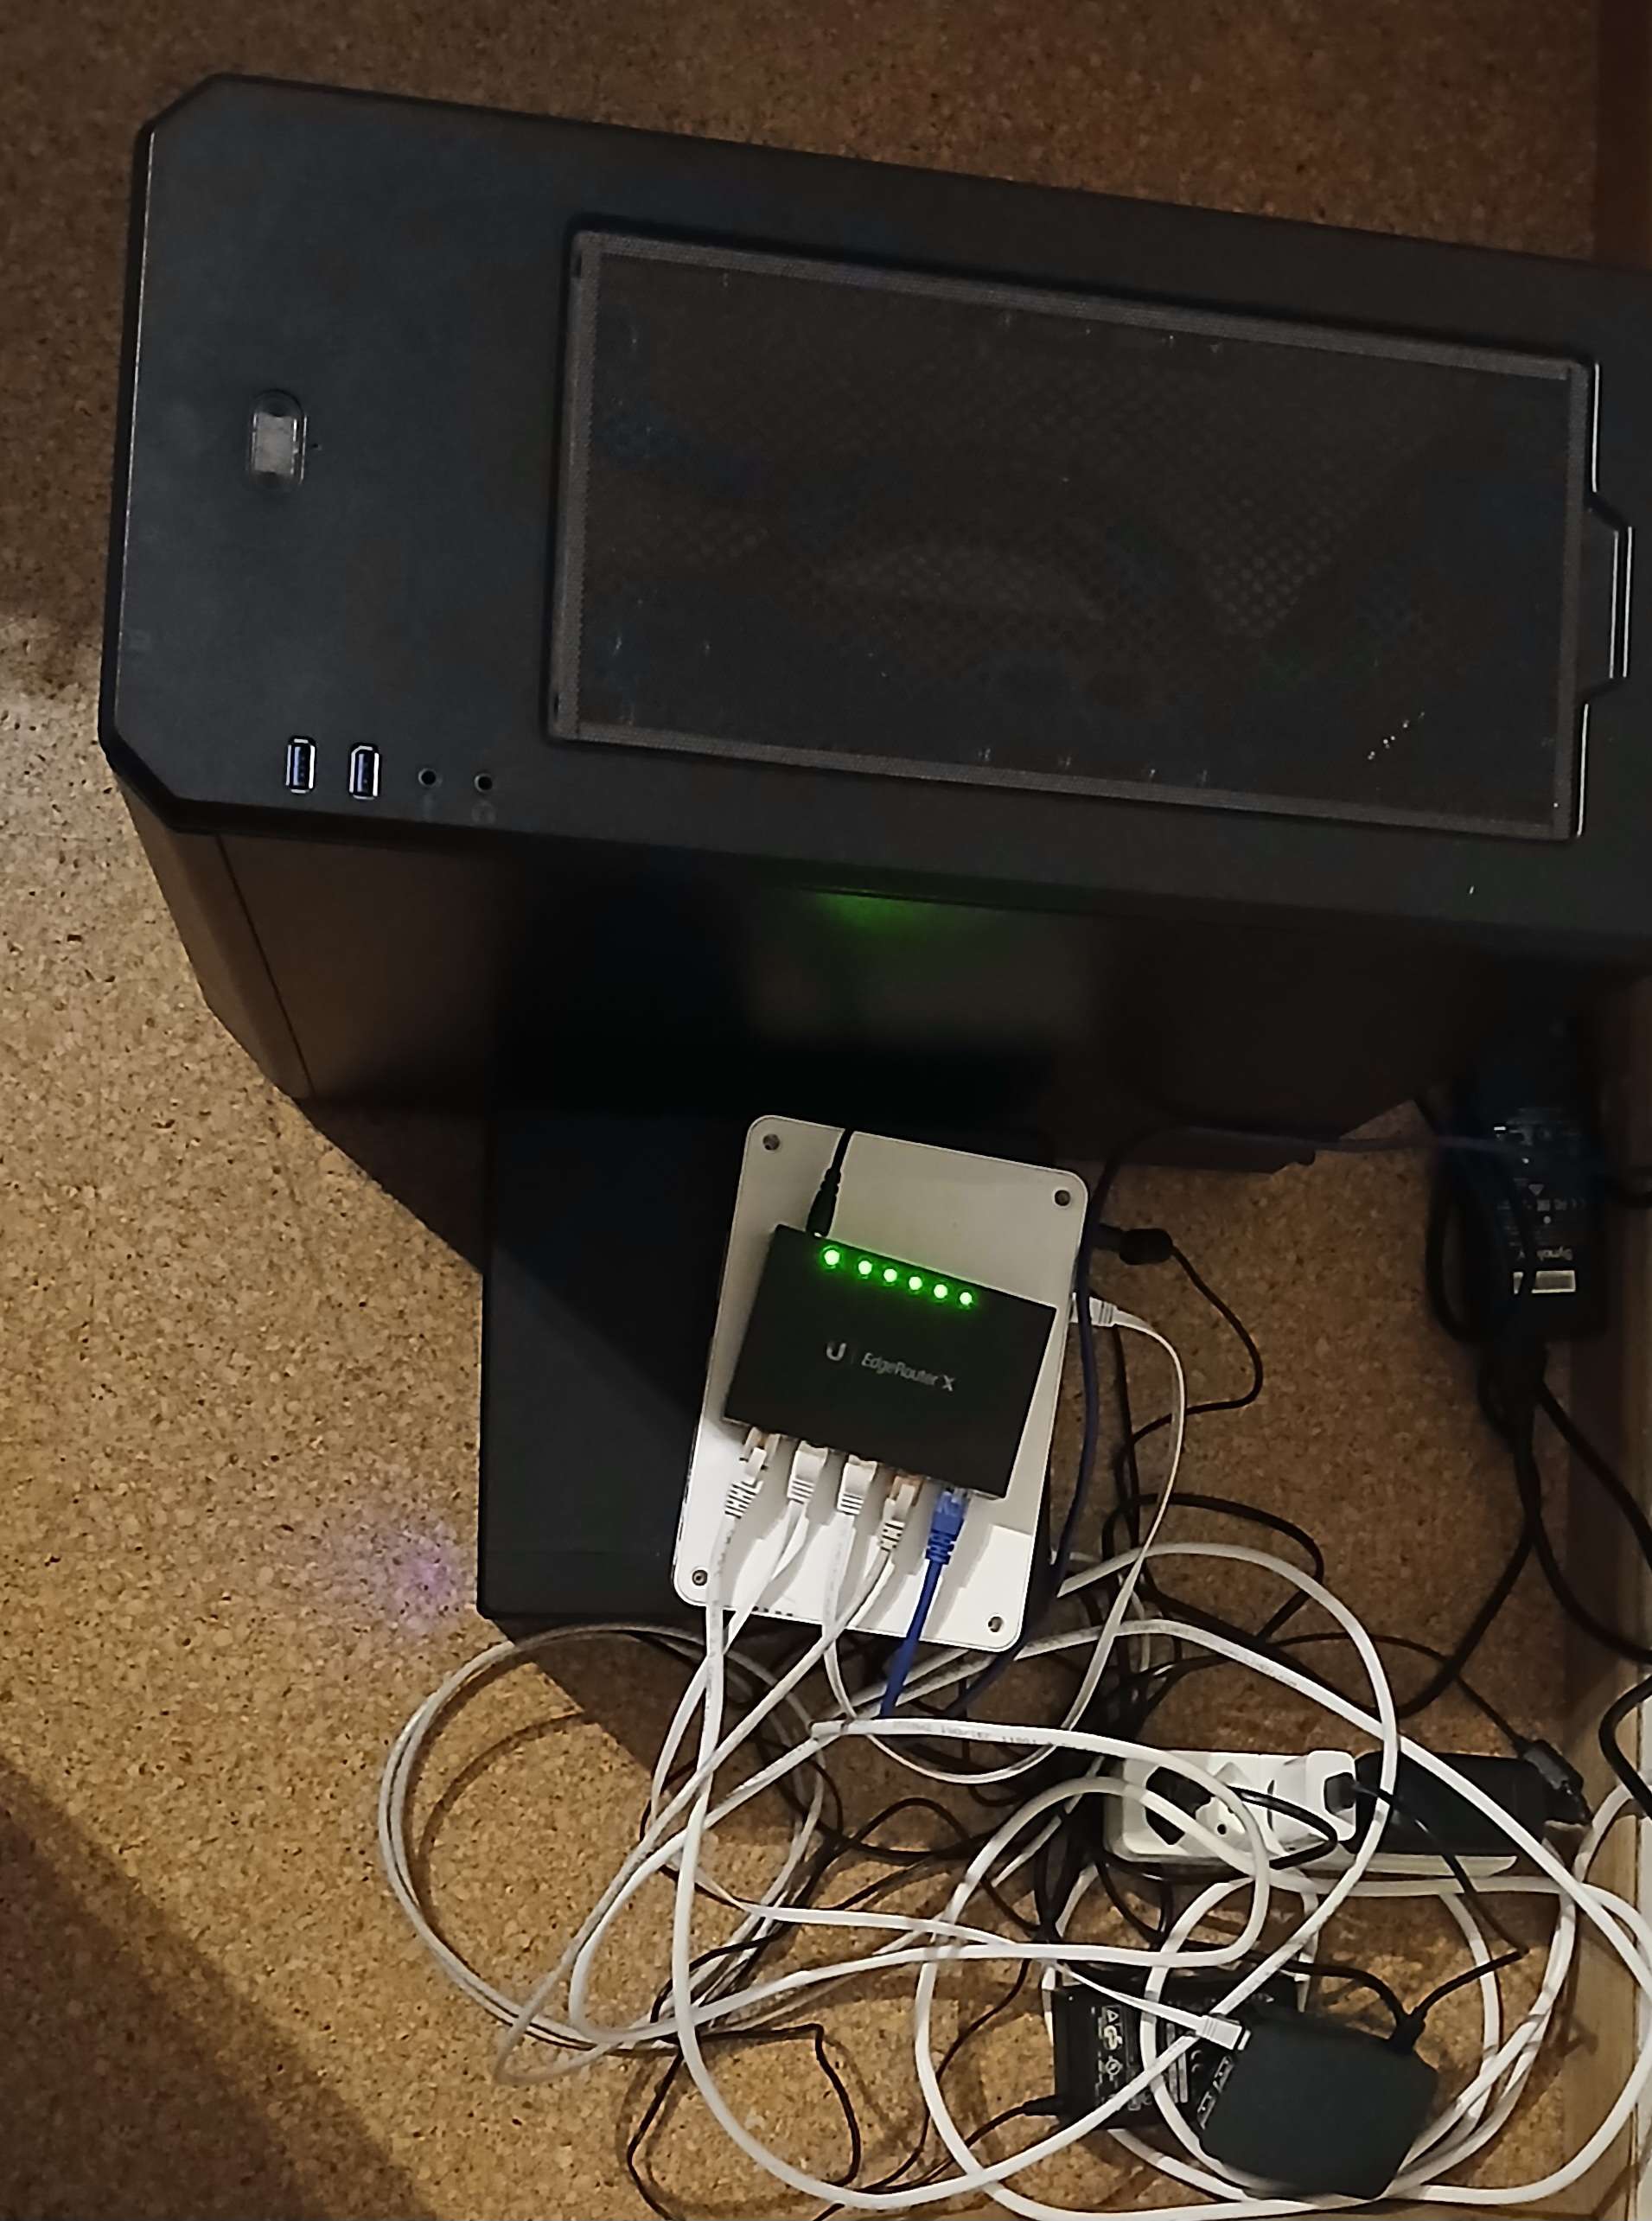
I might write a bit about my ansible setup at some point (how I don’t go crazy with having configuration on 5 devices), but this blog post already took long enough to write.